

How To Make Stop Motion Animation Handrwitten
Stop-motion video is an heady course of animation that uses existent objects instead of drawings or computer renderings. It can be a fun and creative way to tell the stories you desire to tell. With mod tools, this beloved art form is bachelor to storytellers of all budgets and skill levels. In this mail service, we'll talk a little about the history of terminate motion then take an in-depth expect at how to make finish-motion videos of your own. In improver to the nuts of how to do stop move, nosotros'll go over some tips and tricks to assist your blithe notwithstanding photos expect more than lively and professional, only similar those finish-motility movies you lot watched growing up.
What Is Stop Motion?
Terminate-motion video is a uncomplicated animation technique that has been effectually nigh as long as motion pictures themselves. All video relies on a series of still images being played dorsum fast plenty to give the illusion of adding motion. Yet, most video captures the actual movement of animate objects. Stop-motion video relies on inanimate objects, such as toys or clay figures, that are moved by an animator betwixt each frame and photographed. The beginning known commercial stop-move film was made in 1898. Information technology was called The Humpty Dumpty Circus and was produced by animating a toy circus. It's suspected that the technique was used before that in DIY animations by hobbyists that didn't accept commercial releases.
From the 1950s and up until 1981's Disharmonism of the Titans, the technique was too mixed with live-action footage as a precursor to what is now accomplished almost entirely with CGI. Perhaps the most famous examples of stop-motion animation are the children'south shows produced with clay figures. Known colloquially as claymation, these shows include Gumby and several holiday-themed specials. Several major movement pictures were made with the technique in the 1990s, such as The Nightmare Before Christmas, Craven Run, and James and the Behemothic Peach.
Because of the corporeality of work involved, this alternative manner to animate video often has a much lower frame charge per unit than a typical video would have, giving it a distinctive look that has become part of the entreatment.
How to Practice End Move
Making these types of videos used to require special equipment if you lot wanted results that rival what the professionals do. With modern video-editing equipment, it is like shooting fish in a barrel to import pictures taken from any digital camera and sequence them into a video. This ways that high-quality stop-movement animations can be made fifty-fifty with the phone in your pocket. Yous tin can detect many detailed stop-motion tutorials online that will cover every aspect of end-motility film-making, but this post will testify you the basics of how to make a stop-motion animation so you can get started quickly. Despite being a quick overview, we'll still comprehend every aspect of the procedure in this how-to. Terminate-motion animation product starts before you've fifty-fifty picked up the photographic camera or got your props set up. Let's have a look at how to create a storyboard to prepare for your cease-motility moving picture-making journeying.
Making a Storyboard
All professional person productions begin with storyboards, and so the director knows exactly what types of shots they will need. This is even more important for animation considering redoing a scene can take a very long time due to the amount of work required for each frame. A good storyboard ensures that y'all'll get your shots right the offset time, so you lot aren't scrambling to redo hours of work later on discovering things didn't work as well every bit you'd hoped. Below are some steps yous can accept to make the perfect storyboard. To create one, you can apply special storyboarding software, or just draw everything using newspaper and pencil.
- Break downward the scenes – Before you can storyboard your scenes, y'all have to know what they are. It'due south possible yous created an outline of all your scenes during the process of creating the script. If not, then now is the time to get the script out and first going through it page by folio. Each time you become to a new scene, write down the location, time of day, and a brief clarification of what is going on to give you an thought of how to frame the shot.
- Sketch the characters – Your characters are the focal signal of your story. Every shot should be designed effectually framing them in the all-time possible way. For that reason, your storyboard frames should offset with but the characters in them. Remember, you don't have to be an artist to brand a storyboard. You lot aren't making a comic book. No one outside of production needs to come across the storyboard. So don't worry about creating the perfect representation of your characters. Blobs, the full general size and shape of the characters will work just fine.
- Add together the background – The characters being the focal signal doesn't mean that a basic background isn't of import for your storyboards as well. Eventually, you'll take to create your fix, and the storyboards will help tell you the major props that you'll need to acquire or create in guild to exercise that. Go back and add groundwork elements to your frames, taking intendance to brand certain that the characters are never upstaged by the background.
- Mankind out the details – Your storyboards may not exist a comic book, but that doesn't hateful they can't convey useful information. Afterwards getting everything blocked in the way yous desire it, you tin start adding some details. This doesn't mean artful details, such as those that a product-ready drawing may have. Instead, add together details that convey information to the person who will be setting up the shot. What colour are the walls? Are the characters wearing whatsoever unique articles of clothing? You can represent these details in a simple way; just make certain they are represented.
Setting Upward the Camera
Making animation pictures is not the same affair every bit snapping some photos for your Instagram. A peachy deal of care must be taken to ensure that each image is as similar as possible to the one earlier information technology, except for whatever movement has been added to the scene. To make a convincing animation, the viewer needs to believe that the frames were captured within a fraction of a second from one another. Any deviation in the photographic camera volition create unnatural motion or focus. Your stopmotion maker likely has some tools to help with color grading that tin can ready minor mistakes, just those will never be perfect, and they volition be very time-consuming if all of your frames need to be fixed. Therefore, it is crucial to carefully prepare your photographic camera and capture the shots correctly to save yourself headaches subsequently on.
The offset stride to ensuring expert, consequent shots is to utilize a tripod. You should endeavour to use one of the heavier, more sturdy tripods for this job. Smaller ones may be dandy for getting a still ane-off shot, but their light weight makes it easy for minor movements to occur. Those movements volition make your blitheness look jerky and unprofessional. The longer you expect your shot to accept, the more than true this is. Your tripod could potentially have to sit undisturbed for hours or even days.
Similarly, you should set your focus to transmission. Ideally, you will focus it on a cardinal location in the scene and not have to worry nigh it over again. For complex shots, where the character in frame needs to motility forward or backward, you may need to adjust the focus of each frame. Such shots are usually avoided when making end-motion animation for this very reason.
Taking Pictures
Once the camera is properly set up for cease-motion photography, you'll need to have the pictures themselves. It volition likely accept you some practice to figure out how much y'all need to motion the props each frame in order to capture the blitheness you desire. Major keyframes should be timed. You should know ahead of fourth dimension, for example, that you want your character to take one-half a second to heighten his mitt. By dividing this number by the number of frames per second you are aiming for, you lot'll know how many shots you lot need to get of each step in the motion. This alone is a big assistance in deciding how much to motility the characters.
The consistency problems yous faced when setting upward the camera extend to actually taking the shots as well. Even the slightest movement, such every bit pressing down the shutter push button, can cause unwanted motion in the photographic camera that carries over to the animation. If your photographic camera has a remote command characteristic, this can exist a convenient mode of getting the shot without any risk of unwanted motion. Yous also have to work to ensure that the lighting is consistent between shots. This ways leaving whatever lighting setup you lot have in place alone during the duration of the scene. Considering the colour temperature of regular light bulbs tin vary over time, it's also a good idea to use lights that are designed for photography.
Making the Video in a Video-Editing Program
If you're going to larn how to make an animation video, so at some point, you'll need to bring those pictures into a video editor. This is an essential role of the process and will go an entire section defended to it. Here, we'll only outline the very nuts of how to create animation videos using a video editor.
- Import the photos – Some video editing software will permit you lot to directly import a series of image files into a video clip. This is the most convenient style to become all of your images into the editor. If not, you can import all the images and place them in the timeline individually, taking intendance to set up the elapsing for a notwithstanding image to 1 second divided by your frame charge per unit. You can and then export the scene as a clip so that it tin can exist moved around more than easily.
- Adjust your scenes – With your images at present turned into video clips, you can arrange your scenes exactly every bit you would if you were editing video shot in the traditional mode. This includes trimming down some scenes, cutting ones that don't work out entirely, and annihilation else that goes into traditional video editing.
- Add the effects and transitions – Now is the time to put the finishing touches on your video with furnishings and transitions. These volition help brand your final production look professional person.
How to Use a End-Movement Editor
Using a stop-motion editor dramatically simplifies the process of making fantabulous stop-motion blitheness. The tool will make information technology easy to keep your frame rates consistent and provide you lot with an array of effects, transitions, and titling options, so your finished product has more than in common with the big-budget end-motion films of the 1990s than the early on attempts from the nascent days of the engineering science. You volition also be able to import your photos from whatever format they are in quickly and consign them to the almost common video formats, so you spend less time struggling to make the technology work and more fourth dimension editing your blitheness.
Here's how to use Movavi Video Editor Plus equally a stop-motion editor.
Stride 1. Install Movavi Video Editor Plus
Download the installation file and install the program on your computer following the on-screen guide. After the installation is complete, click the Start button in the installation window to launch the program.
Step 2. Add Photos to the Programme
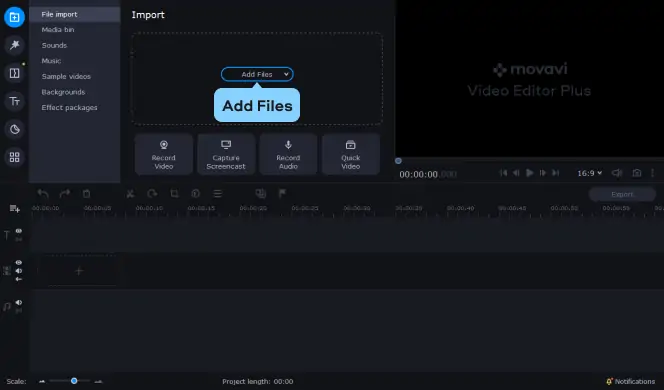
Click the Add Files button, detect the folder with the pictures you've taken, and select the appropriate photos. The files will exist added to the Media Bin. Now yous tin can drag-and-drop them to the Timeline. To change the position of a picture in the moving-picture show sequence, drag it to the desired position on the Video Track.
Step three. Set the Timing for the Frames
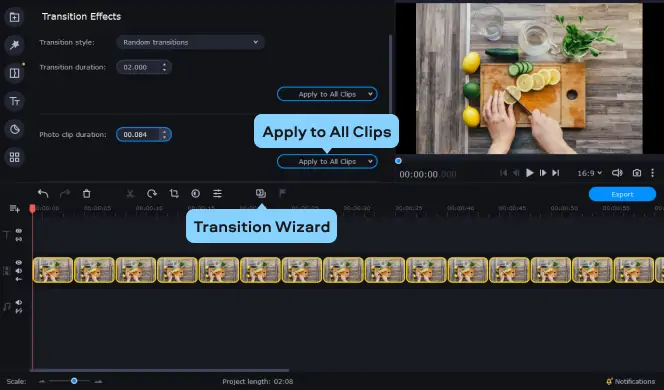
Click Transition Sorcerer and prepare the timing in the Photo clip duration field. To create a video with 24 frames per second, enter 00.042 in the field. To make a video with 12 FPS, enter 00.084. If you lot don't have plenty photos, choose a longer epitome duration. Click Employ to All Clips to set the duration.
Step four. Add Caption
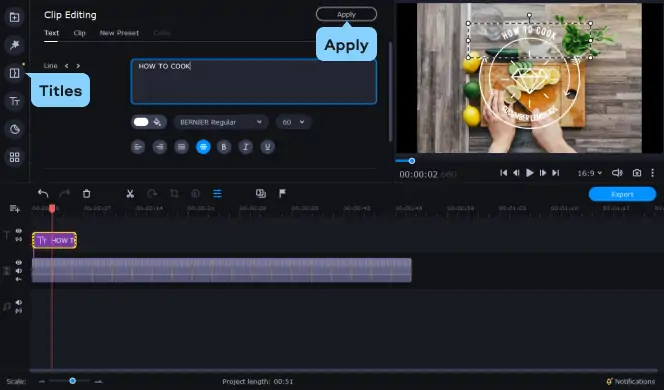
Click Titles, select one of the suggested options, drag and drop it to the Titles Track. Edit the text, color, and duration of the titles. When you're satisfied with the consequence, click Apply.
Footstep 5. Add together an Sound Runway
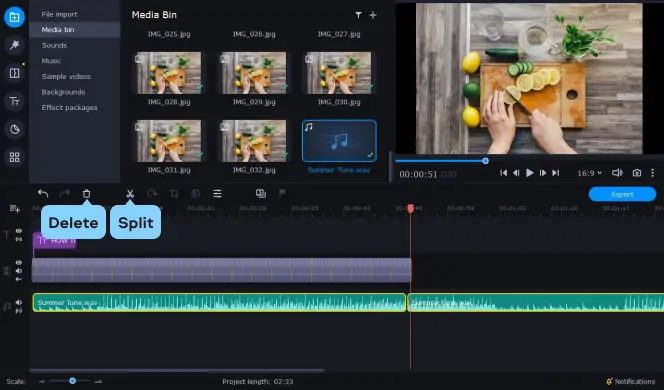
To add music to your video, open the File import tab, click Add Files, and cull an audio file. So, drag and driblet information technology from the Media Bin to the Audio Track. If the sound track is longer than your video, cutting it to fit. Click the sound, set the red marker where the video ends, and click the Split button. It will cut your sound track into two parts. Select the unwanted part and striking the Delete push on your keyboard to remove information technology.
Pace half-dozen. Save Your Video
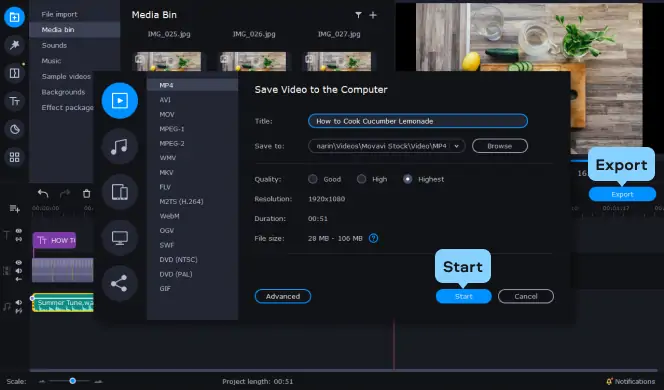
Click the Export push button and enter your preferred save options. You can salve your animation in whatsoever pop format, set it for uploading to a particular device, or share it on YouTube. To save the moving-picture show, click Outset.
Now y'all know how to create a stop-motion video sequence with Movavi Video Editor Plus.

Movavi Video Editor Plus
Brand videos. Create. Inspire.
* The free version of Movavi Video Editor Plus has the following restrictions: seven-solar day trial period, watermark on the output videos, and, if you're saving a project every bit an audio file, an ability to relieve only half the audio length. Learn more than
How to Brand a Cease-Motion Animation If You lot're a Beginner
Hopefully, you've found a lot of actionable information in this mail that will get yous started on creating your finish-motion animation. Simply sometimes, but getting started on a new hobby can seem daunting. Here are a few helpful tips to assist y'all get over that hurdle and get you creating.
- Exercise first. A few test animations will build your skills and conviction.
- Plan everything ahead. At that place's a lot of work. Exercise it right the beginning time.
- Use everyday objects effectually your home for props.
- If you're an artist, you lot can paint or describe backdrops.
- Claymation was popular considering of how easy dirt is to move and mold. Try it!
- South Park famously mimics the newspaper cutting-out mode of stop motility. Try using the real thing.
How to Make a Finish-Motion Video with iPhone
If you are looking for a stop-move app for iPhone, Movavi Clips is an piece of cake way to create your cease-motion animations. Clips will allow you to easily convert your images into a video of up to x frames per second. To do so, follow the steps beneath
- Tap the withal camera icon – To load media into Movavi Clips, y'all are prompted with the icon of a video camera and the icon of a still camera. Selecting the still camera lets yous pick photos from your phone'southward camera coil.
- Select your blitheness photos – Import all of the photos that brand up your scene. Yous can select multiple photos at once, then bringing them in should exist easy.
- Select an attribute ratio – As the terminal step of setting up a projection, the app will enquire y'all to select an aspect ratio. Option the one that matches the aspect ratio you used to take the photos.
- Set the photo duration – You lot accept a bunch of photos in your timeline, only they look more similar a slideshow than a stop-motility video. To change that, look at the icons above the timeline and tap the 1 that says duration. Lower the duration to match your desired frame rate; clips can go down to 1/10 of a 2d.
- Conform the photos – If whatsoever of the photos were not imported in the right order, you tin easily drag and drop them to go them where they are supposed to be.
- Save the scene – Utilise the save icon in the top right of the screen to export your cease-motion animation to a video. If you have a multiple scene projection, you can make each scene into a video clip and so edit those clips. This will make it easier to add transitions and other effects.
Now that you know how to make a terminate-motility video with an iPhone, you'll be able to practice your terminate-motility skills from anywhere. Movavi Clips is powerful enough to be the only editor you'll need. Or y'all tin use it every bit a practice tool before moving on to Movavi Video Editor Plus on your desktop estimator, like in the video below. Either way, accept fun with your new hobby!
Movavi Video Editor Plus
Brand videos. Create. Inspire.
* The free version of Movavi Video Editor Plus has the following restrictions: 7-24-hour interval trial period, watermark on the output videos, and, if you're saving a project as an audio file, an power to save only one-half the audio length. Learn more than
Come across Other Useful How-to Guides

Sign upwardly for news and special offers

Screen Recorder
An easy way to record from your screen in HD. Make video footage of whatsoever application, record online streaming video, webinars, even Skype calls, and relieve clips in all pop formats.

Movavi Picverse
An intuitive photo editing app that lets yous retouch whatsoever photo on the fly. Meliorate quality, add filters and captions, remove unwanted objects, change backgrounds, and more!
Source: https://www.movavi.com/support/how-to/how-to-make-stop-motion-video.html
Posted by: simpkinsnocarain.blogspot.com
0 Response to "How To Make Stop Motion Animation Handrwitten"
Post a Comment